Discovering what functional modelling is – and why it's so important
Teaching inquiry
How can I create units of work for my junior school students that will not only engage them, but also provide opportunities for them to learn the skills and discover the benefits of technological modelling?
Introduction
Coastal Taranaki School teacher Sally Laing has found that focusing on the use of functional modelling to generate and test ideas has helped students develop:
- the language to talk about modelling
- more understanding of the purpose of modelling
- a greater willingness to try out new ideas.
In recent years, Coastal Taranaki School has transferred some of the responsibility for technology teaching in the junior school to specialist teachers. Students in years 0–4 have 50-minute sessions for seven weeks; those in years 5–8 have 50-minute sessions for half the year in both food technology and materials technology.
The technology teachers decided to focus each term on a specific component from the nature of technology or technological knowledge strands, as well as teaching technological practice.
Teacher Sally Laing has developed a series of technology units for students at different year levels. All involve the use of functional modelling to come up with and test design ideas.
Functional modelling
The curriculum focus for the new units was functional modelling: technological modelling (levels 1 and 2, first two indicators) and modelling in practice as described under outcome development and evaluation.
Before beginning work on each specific project within a unit, Sally got the students to explore their ideas about modelling. In small groups, they brainstormed what they knew about modelling and where they had used modelling. They then shared their ideas in a class discussion.
Most started by talking about modelling on the catwalk. I used questions to direct their thinking:
When had they made models? Could they think of any models they had seen others using?
What was the purpose of the modelling?
Sally Laing
Sally spoke about the modelling she did in her own practice as a jeweller. A TV programme (The Food Truck) sparked discussion on modelling in the context of food. The students also understood how playing with Lego and similar toys is in fact a kind of modelling.
I wanted to develop understanding of the different types of modelling and when they can be used. So I gave each class an initial brief and specifications for their project. We then discussed how thinking and talking are part of modelling, and how, particularly in the early stages, modelling can be used to develop and trial ideas.
Sally Laing
Sally put a list of functional modelling vocabulary on the classroom wall and revisited it at the start of each lesson. She finds that younger students especially are sponges for new vocabulary and love finding ways of using the words.
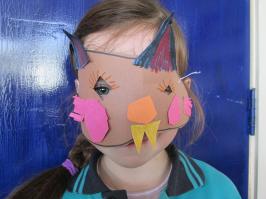
Years 3–4 unit: Masks
Design and make a face mask that gives you a different persona (it must fit your face).
|
|
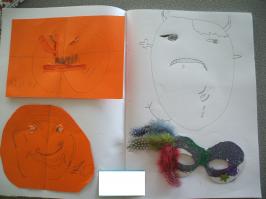
In planning their masks, Sally wanted her students to quickly draw the attributes of their character, without agonising over the details.
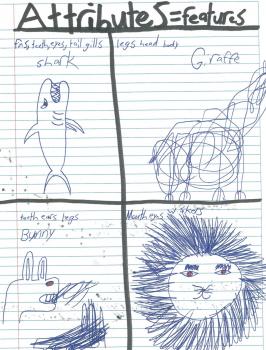
The Pictionary technique proved ideal. She gave each student a blank piece of paper, named a creature, and gave them 45 seconds to draw the essentials.
They soon realised that they could give an impression of a particular animal by drawing a few key attributes – for a rabbit … long ears and so on.
Sally Laing
Once the students had sketched their idea for their face mask, they modelled it as a collage of sugar paper. This enabled them to “get their ideas off the page.” Sally showed them how to cut and curl the paper to get ears, whiskers, and other features.
Further modelling with sugar paper helped the students determine the size and shape of the mask (so that it fitted their face), where to put the holes for eyes, and how and where they would attach the mask.
Sally had earlier ordered pre-cut mask templates thinking that, given the limited time available, the students could transfer their own designs onto these. This turned out not to be a good idea:
I could see from the functional modelling process just how truly creative the students were. I wouldn’t use the templates again because the students were unable to transfer their ideas to them and, though the outcomes were still creative, they were not true to the original concepts.
Sally Laing
So next time, Sally plans to have students develop the entire outcome from scratch, using a heavyweight card that they can cut themselves.
It is very important that we give students confidence in their own creative and problem-solving abilities. All too often I meet older students who self-censor ideas without first modelling them, because they "are not right".
Sally Laing
Year 6 unit: Sock puppets
Design and make a sock puppet. It must move and be used to tell a story with your friends.
|
|
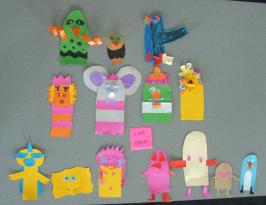
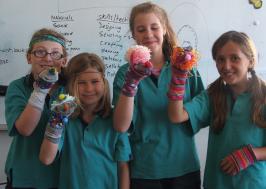
For this unit, the students wrote stories and created sock-puppet characters to perform them.
Again, the aim of the modelling (drawing and collage) was to identify and depict the attributes of the characters.
The students went on to create their own sets and to put on a performance at the end of the unit.
It was evident from the finished puppets and performances that the students had very effectively captured the attributes of their characters. The modelling had definitely helped develop their thinking.
Sally Laing
Reflecting on the project, Sally felt that next time, she would:
-
- have a collection of socks and other resources available for the students to use
- limit the length of the stories
- provide more time for designing and making the sets – the students had really enjoyed doing this and there was a lot of learning that could have been built on.
Year 6 unit: Mirrors
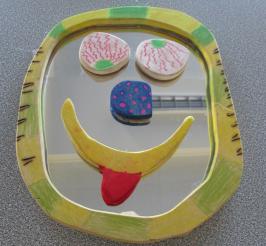
In this unit, the students designed and made decorative mirrors. The students first:
- sketched their ideas for mirrors
- modelled the mirrors in paper
- modelled them in card and foil (the latter representing the mirror) and checked whether the frame would cover the mirror.
Sally had precut pieces of MDF for the frames. The students spent time checking and adjusting further paper models until they were sure that, when made, their frame would fully cover the mirror and fully utilise the MDF.
With this phase of modelling complete, Sally gave the students a piece of heavier card that was the same size as the MDF. Using this, they made a template for their actual frame.
Once cut, they students had to colour/decorate/ornament their frame in some way. They modelled possible designs in their books and on scraps of MDF. Some wanted to use pokerwork, so they had to test their ideas and practise their technique on scraps of MDF before transferring their design to the final outcome.
For more information about the Mirrors unit, see Colour on metal: Design and functional modelling in year 6.
Year 8 unit: Ugly toys
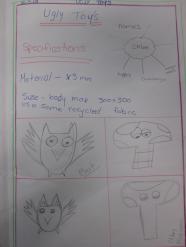
For this unit, the students designed and made ugly toys. To start this project, the students:
- investigated ugly toys as a homework task
- watched a presentation on ugly toys and used this as the basis for a discussion on characterisation
- used drawing to model ideas for their own ugly toy.
To construct their toys, the students had to learn some new skills, including how to use a needle and thread. They practised running stitch and backstitch so that they could sew on the hair. They also learned how to make patterns, which provided an opportunity to discuss how patterns are a form of functional modelling. The students then made their own patterns, including for special features such as ears.
Sally was fortunate to have help from a parent with expertise in pattern making and sewing. She was very good at encouraging the students in their designs and showing them how to alter proportions.
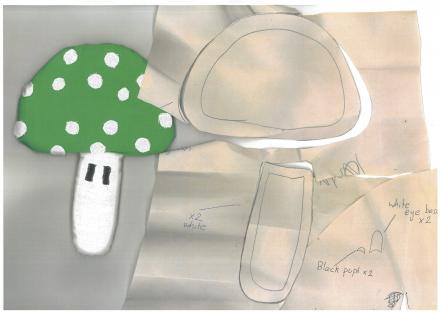
For a while, it looked as if they might run out of time to complete the project, but once the students saw their toys beginning to come together, they became really excited, and got stuck into the sewing. They were supportive of each other. Teachers even observed students working on their sewing together.
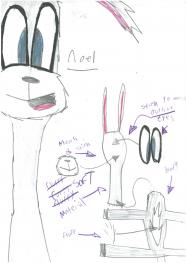
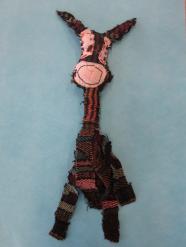
When it comes to an ugly toy, there is no right or wrong outcome in terms of appearance! This seemed to liberate the students. One special needs student with well-developed drawing skills followed the modelling process particularly well and her outcome clearly captured her initial idea.
|
|
In their evaluation, the students were asked to describe how they had used modelling. Their responses included:
Year 8 students
- to design and change my plans, like a brainstorm
- to help me decide
- to have designs for my toy
- to create an outcome
- to imagine what my design would look like, and if my structure and plan would work.
Year 7 unit: Gingerbread house
Sally had read a teaching snapshot about Gingerbread houses and could see that this context could have opportunities for teaching modelling in technological practice.
The students trialled several recipes in order to determine which gave the most successful outcome. Coincidentally, during the week there was a newspaper article about gingerbread houses in the local paper. The recipe in this article proved very successful, so all the class used it.
Sally used the gingerbread house project as an opportunity to include discussions on the types of modelling that architects use.
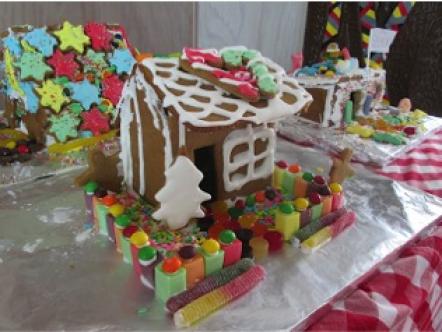
The students drew their designs, made templates, and then used the templates to help them cut the various pieces for their gingerbread houses. They were able to discuss the purpose of modelling the pieces, for example, that the walls could be too thick or that they might not support the roof. This has helped to grow functional modelling understandings in a foods context within technological practice.
Outcome
Based on classroom observation and student evaluations, most students now had the language to talk about modelling and could see the purpose and advantages of modelling in practice. They could also see that it stopped them from wasting materials and time.
Another outcome was greater creativity of thinking, leading to a wide range of outcomes – modelling encourages creativity too!
What next?
With each of these units, there is a lot you could do to extend students and encourage creative expression, but there always seem to be time constraints. Establishing these units has taken a lot of work – but when I revisit them next year, I’ll only need to tweak them.
Sally Laing
Sally would like to grow her students’ understanding of technological modelling beyond practice. She plans to explore modelling in other contexts and to develop a method of assessing precisely what students understand.
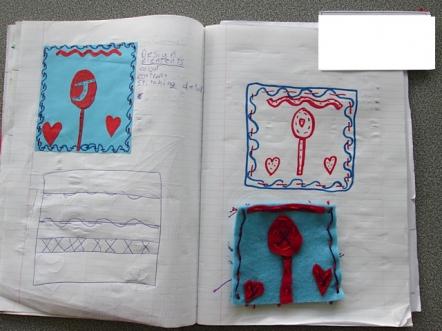
With a group of year 5 students, Sally has also trialled a unit in which they made felt badges that they could attach to a bag or item of clothing. Cutting pieces of paper and gluing them onto a square of paper was a very effective modelling exercise.
At the time of writing, the school is getting ready for its annual production. The year 6 students have been asked to build three woven nests to be used as props. There may be another modelling story in here: the nests have to fit three students from the new entrants’ class – and survive until the end of the final performance!

