Te Papa and Beyond - Paloma Davis
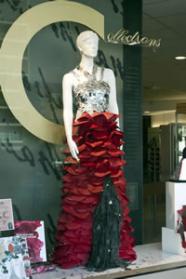
Paloma Brown developed wearable art for her client, the Te Papa Store, to coincide with a focus on the World of Wearable Arts events in Wellington. Her garment was displayed in the main window of the Museum of New Zealand Te Papa Tongarewa.
Given the theme 'Glitz and Glamour', Paloma considered how she could use recycled materials to meet this specification. Her final design incorporated a long calico skirt decorated with ruffles, a bodice with a shiny mosaic effect and a matching handbag.
Trialling paper ruffles
Paloma designed the ruffles on the underskirt to add glamour to her costume, and made them from a roll of discarded paper given to her teacher. The paper was very fibrous and Paloma decided it would be strong enough to shape, paint and sew on to the skirt. She spent a lot of time trialling techniques, making samples of different shapes and sizes before deciding on a triangle – overlapping each triangle shape looked most effective. Paloma also trialled sewing the triangles on to calico and found that machine stitching was faster and neater.
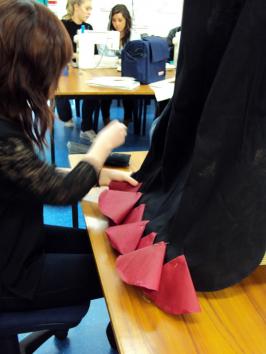
Paloma trialing paper ruffle techniques.
Paloma tested painting the paper and decided to paint both sides because it made the material much stronger. She also trialled painting with different tools – this showed that the choice of application method can make a considerable difference to a project. Using a sponge roller, instead of a paint brush, was both faster and more economical – it spread the paint in a thinner layer and the paper dried faster because there was less paint.
Trialling mosaic techniques
As she developed her concepts, Paloma was inspired by the idea of mirrors – for their reflectiveness and because they fit the image of a glamorous woman dressing for a glitzy occasion. She designed the bodice of her garment to give this effect, planning to use tin foil as the shiny material. Paloma trialled different methods of attaching the tin foil but none of them proved successful. She first fused tin foil to interfacing, and cut the fabric into different shapes. However, when she stitched them on to calico using the sewing machine drawing tool it was difficult keeping the stitches around the edges of the shapes, and the tin foil ripped easily. Paloma changed to the standard foot but that one ripped the tin foil even more. Although her teacher liked the effect, Paloma and her classmates though it looked too messy and didn't give the desired "jewel-like" effect.
Trying a different approach, Paloma used tin foil as a base and sewed pieces of black ribbon on to give the impression of cracks between mosaic shapes. This sample looked good from a distance but wasn't very impressive close up, lacking the sparkle that the other methods gave.
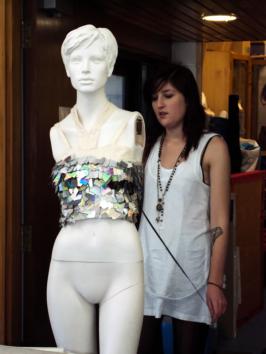
Paloma ties CD pieces to the bodice of her design.
There wasn't much time before her next client meeting, so Paloma felt under pressure as she considered how to get the look she wanted with these materials. She investigated origami and trialled shapes made from interfaced tin foil but although she liked the diamond shape it was hard to get clean folds and the tin foil peeled off easily.
Abandoning tin foil, Paloma looked to other materials and experimented with CDs. Cut-up CDs gave the shiny look she wanted – and her teacher's school notice asking for old CDs resulted in a boxful. Paloma tried cutting and drilling the CDS and decided drilling was more effective although it took care to ensure the CD didn't crack. Sometimes the top layer came off to reveal clear plastic – she solved this problem by covering the plastic with foil. Paloma stitched overlapping layers of these and the reflective CD pieces onto the bodice, and says that this added more dimension and detail to the garment than the CDs alone.
In retrospect, Paloma thinks she should have conducted more extensive testing of the CDs because some types flaked when cut. But although she spent a lot of time trialling different ideas, she says it wasn't wasted time because it exposed her to new techniques.
Production processes
After much testing and trialling, Paloma had settled on the construction techniques she would use. Mass production of the decorative items, however, was quite time-consuming, so during construction she modified some of the processes to make them more efficient. She had begun making the ruffles by ironing each paper shape on to interfacing but to speed things up ironed large strips of paper to the interfacing and then cut the circles out. This process evolved again when she realised it was easier to paint, iron and dry before cutting the circles, and she made the strips of paper bigger so that she could fit more circles on and speed things up even more. Sewing the paper into cones, for the ruffles, was a huge job so Paloma was grateful to get some help from her teacher during this stage of the process.
Drilling hundreds of CDs also took a lot of time so Paloma did this at home; she "hired" her stepfather to do the bulk of it – under supervision, of course!
Construction
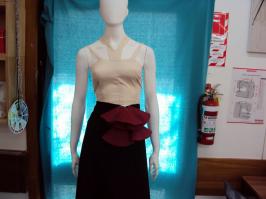
The bodice during construction phase.
The bodice and under-dress were made in calico which Paloma painted silver, "to make it shinier and more texturised, and to match the colour and theme". She adapted the bodice from a dress pattern; after investigating fastening methods she decided to lace-up the back to make it easier to adjust on the mannequin. Paloma also had to consider the weight of the CDs so decided the bodice needed at least one strap to hold it up. After trialling straps she decided to have two which she placed close to the neckline so that the front, decorated with CDs, would resemble a diamond-encrusted necklace. Paloma sewed the CD pieces on from the bottom, overlapping them as she moved up the garment.
After completing the dress, Paloma asked classmates for their feedback. Several commented that the white showed up underneath the red ruffles, and she realised that even more would be revealed when the mannequin was displayed at the higher level of the window. With time in short supply, one of her classmates helped paint the underneath and inside of each ruffle.
Accessory
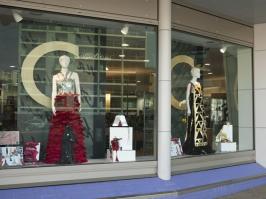
Paloma's design on display at Te Papa.
In response to her client's request for an accessory, Paloma designed an evening bag made from cardboard and masking tape. She covered it with red paper left over from the ruffles and pieces of chopped-up CD. Cutting the CDs into the right shape was difficult but gluing them onto the bag was easy, she says. Paloma made the handle from scraps of black stretch cotton, the colour chosen to balance the red/metallic look of the bag.
Installation
The garment attracted a lot of attention when installed in the Te Papa window, and passers-by stopped to read the display board which explained why and how the garment was made. Paloma says she is happy with her outcome and that she loves the contrast between the hard, jagged look of the CDs and the soft paper, curved edges and warm colour of the ruffles. Paloma was awarded a New Zealand Scholarship in Technology for her work.

